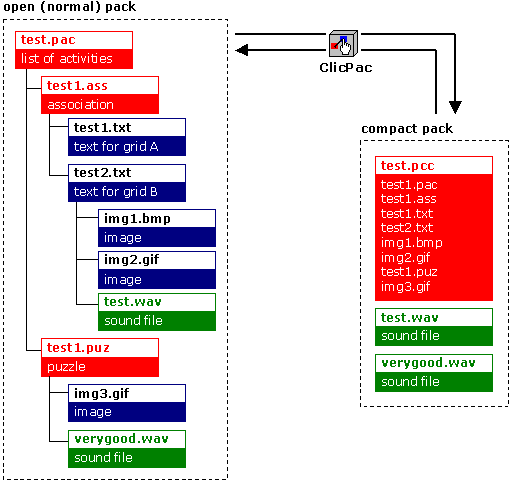
The ClicPac utilityAs we saw at the beginning of the course, Clic packs can be presented in one of two formats: normal packs (.PAC) and compact packs (.PCC). The basic difference between the two types of packs is in the information contained in the files. The PAC packs only contain references to the activities (we could say they are like a "shopping list"), while the PCC packs contain most of the necessary ingredients to make them work (following the same analogy, they would be the equivalent to a "shopping basket"). Multimedia files can never be put in the "basket" and have to stay as independent elements in the working directory.When a compact Clic pack (PCC) is used all the activity edition functions are disabled. To check the "shopping list" and examine or change the contents you have to open the "basket" and spread the ingredients on the table. The compact format (PCC) is ideal for distributing Clic applications once they are finished. It has two clear advantages over the normal format:
- It protects the materials from accidental changes or intentional changes by the students.
- It facilitates the transfer of materials from one computer to another as most of the components are gathered in one file. The ClicPac utility, which is installed with Clic, can be used to pack normal packs or unpack compact Clic packs.
Compacting packsThese are the steps to compact a pack:
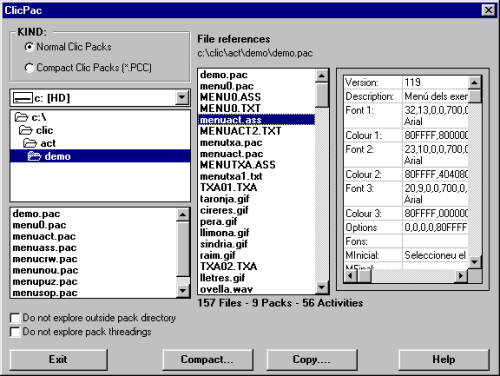
- Start up ClicPac. A screen like the one below will be shown: - At the top of the screen select Normal Clic packs (*.PAC)
- Search for the application that you want to compact in the directory list.
- Select the file for the main pack. The programme will analyse the dependencies between the application's components and will advise of any errors, e.g. a call to a non-existent file. If there are any errors, you will have to close ClicPac, check the activity with the error, fix it and start again.
- Click on the Compact button.
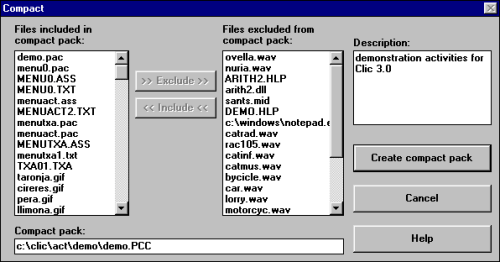
- The screen below shows all the files that will be in the compact Clic pack on the left and, on the right, the files that will be left out (WAV, MID, AVI, DLL files, etc.): - Click on the Create compact pack button.
- When the PCC file is created, the programme will ask if you want to delete the component files. It is recommended to say yes to avoid wasting disk space with copies of files that are no longer used.
Separating packsHere are the steps to separate a pack:
- Start up ClicPac.
- Select Compact Clic packs (*.PCC) on the top-left of the options window.
- Search for the application that you want to extract in the directory list.
- Select the appropriate PCC file.
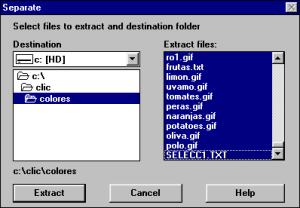
- Click on the Separate button. A screen will appear with a list of the files in the PCC file. In principal, you should select all of them. - Click on the Extract button. ClicPac will create the files as independent units in the working directory. As a last step, we recommend that you delete the PCC file as there is no need to have it on the hard disk once the application has been converted into a PAC. You can delete the file with the Explorer in Windows. Some comments on compacting and separating packs:
- If a pack is separated directly from a CD-ROM or a unit in a network with "Read only" rights, you will have to select an alternative destination on the hard disk where ClicPac can write without restrictions.
- The icons created by the installers of the Clic activities in the Windows "Start Menu " or "Program Administrator" usually point to a PCC file. If you delete the PCC file after separating it (as suggested in the instructions), the icon will stop working. If you want to keep on using the icon, you will have to change the short-cut properties so that they point directly to the PAC file. In W95, the short cuts are normally found in the C:\Windows\Start menu\Programs\Clic folder. While creating activities it is normal to do tests and create different files that may not be used in the end. ClicPac offers the chance to "clean up" by copying all the contents of a normal pack to another folder. Here are the steps:
- Create a new folder and give it a different name to the folder used to create the activities.
- Copy the pack from the old working directory to the new one by using ClicPac.
- Delete the application's original folder. From now on the "good" folder will be the new one, which will only contain the necessary components for the activity pack. On deleting the original working directory, all the files that were not being used will have been deleted.
|